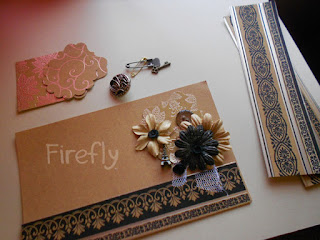
Okay, so I had to come with a new post for our final bit because I couldn't upload anymore photos :(
This is our final post for this brief class.
The Bands... our finishing touches?
The patterned paper with the bands and boxes. If you feel you need a little extra something to jazz up your page, perhaps a border, or another element within the background, let's try these bands.
I trimmed my paper... and tried this.. it seems like too much is happening with the two black ornamented designs and black band at the bottom.
This one's slightly better, with a bolder black, again the idea of too many black things as compared to one, that holds your attention. :)
I don't like my things cut all neat and tidy... I have to have an aged and grunged look :)
Of course, you may have a different view.
Our Layout :)
Do you feel this was easy? :) Wasn't it? Just takes a bit of time and effort... and a wee bit of thought and creativity :D
If you feel like the posts have helped you, and are ready to present your layout, why not share it?
You can treat the isle, with an old ink pad by just running it over the edges.. you can even use an old dried out marker, go over the isle at the corners in circles... I'll teach you all this in our next few classes :)
I made a few alterations to mine, by treating the nude base. To make it more like a finished piece... I have a collection of stamps I love to bits, and I love printmaking, so incorporated them within the backdrop. They have all been stamped with a bronze ink pad to give it that muted look over the nude base.
The stamps I used:
- a grunge bubble wrap by KaiserCraft *the bubble/dots you see*
- Pappilion by Tim Holtz *the butterflies...*
- grid-like texture by KaiserCraft *the grid diffused at the bottom*
- a tiny text in vintage writing by Prima *the top right corner* LOVE this.
I smudged my ink pad across the edges... to give it that aged feel :)
So, what do you guys think?
You may be wondering why it's called the '10' embellishment project.
Here's why :)
- 3 large flowers
- 3 small rosettes
- 1 button
- 1 metal find
- mesh/net
- isle
Congratulations on your first ten embellishment project :) Things will seem a LOT easier for you from now on :D


Love it! im definitely trying out the dried out marker technique, i dont like too much neatness too, keep on ripping the pages or use a knife for distressing... this looks absolutely wonderful, thanks heaps for sharing it with us :)
ReplyDelete