Well, I'm on vacation. Hehe. And this is actually the best retreat as I get to explore and tread on art therapy. As I am not used to feeling idle, I pick up crafty things to do on my own without a brief or requirement from clients, no deadlines... and just an opp to explore different media.
I haven't splurged fully, so I've been sampling and if I like these, I'll probably invest in more colors and what not. This blog post is pretty much a demo and a tutorial. What often happens is we don't know the use or the technicalities of a lot of chemicals and inks we purchase. This is to help you with that so you can eventually invest or consider buying them.
Once you're done reading, do leave your feedback as a comment on the bottom of this post :)
PS: I haven't all my tools and things on me so can't do one on embossing and stamping inks yet. Shall cover those on the next round :) inshaAllah!

Rule Number ONE... if you don't know the use... do some research... if you're experimental, try one at a time. These inks can eat up our pocket. :P
Liquid Pearls
These read as dimensional pearlescent paint. The colors for these were gorgeous, and I HAD to buy them. I have no idea what I'll use them for but they're fun to try out, right? :)


I haven't yet gotten the hang of controlling the consistency but here's what they look like on paper.
These would be sweet as little accents on flowers or geometric designs.
The Fad about Distress Inks

There is a tidal wave in the market for Tim Holtz Distress Inks. They're intended to give your work an aged and distress look, perfect if you're into vintage and mixed media! When I first bought mine, I honestly didn't like it. I thought I was better off using a dried stack of Martha Stewart Inks. A week ago however, I bought one again. To play around with. And I must say, first impressions are never lasting!
Ranger produces these distress inks and other amazing products. They have an ink blending tool and the whole shabang. But for, the fix-it crafter I am, I decided to skip the ink blending tool (namely because I packed it away in a suticase) I tried using it without.. and the above is the result I acquired.
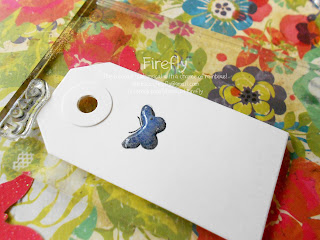
A lof of you ask me if you can use Distress Inks in inking your stamps or using them while stamping. For this blog post, I actually went ahead and stamped a little butterfly with each distress shade to let you know the result. It is pigment ink, which means it's wet and stays that way for a bit.. but given it's created to give that aged feel, the sponge doesn't quite ink the stamp the way you'd want it to.
I have 5 colors I demonstrated with.


The top of the tag is distressing by dabbing my fingers onto the ink pad and patting on to the tag edges. The bottom, as you can see is more intense, is directly brushing the ink pad against the cardstock tag. This isn't the most appropriate way as it just uses up a LOT of ink and becomes too intense for the distressed look. *you can see it in the photo* You can try distressing without inking your fingers by using cotton swabs, the eye shadow sponge swabs, an every day sponge, cotton fluff, or the actual ink blending tools.
You can also crinkle and scrunch up your paper and rub over it with the ink the same way for a visual and physical distressed appearance on your projects.
For the demo I have used Victorian Velvet, Tea Dye, Wild Honey, Crushed Olive, and Broken China.
The tag below is something I played around with using some stamps, archival ink, broken china and wild honey distress inks. The green is where the two over lapped. I didn't use any other sponge or applicator, just smudged with the fingers.

Distress Stains
Continuing the range of Tim Holtz products, there's also something called Distress Stain. It's ink that
comes in a little bottle with a sponge dabber at the end. I currently bought these two to play around with. For the demo I've used Vintage Photo as I used wild honey for the distressing earlier.


That's teh sponge on top.

What you do is, shake up the ink a bit.. squeeze the bottle gently, and the sponge releases some ink.. the more pressure you apply on to the bottle and surface, the more ink there is. For the tag, I've just gone over to create a darker intensity. Squint your eyes and study the tag for a second... you can see a gradation in the color. Because of the amount of ink I've used over it. This is fun to use with embossing and resist inking. You'd get some fab results if you keep playing around. You can also dab it for the distorted effect on the top right.
These are available in several colors, not as many as the distress inks though!
Adirondack Inks
This is another product by Ranger and Tim Holtz. These are alcohol based inks, which directly tells you that they dry SUPER fast. And they have that nail polish remover smell because of all the ethanol in it! These will bleed and run if you pour spirit, thinner, or nail polish remover over them, as they will mix.
I find them interesting to use over plastic. On paper, not so much. They bleed through and dry super fast so you can't really blend them unless you have the hair drier blowing the ink in all directions... they're not really intended for paper to start with. They're used on glass, and other slick surfaces. There's a specialy gloss paper you can use these with to retain all the media properties. Tim Holtz also has those acrylic charms you can use these to ink with. These alcohol based inks are fade resistant and are permanent.


Just playing around here, you can see clearly how much these inks bleed!
I tried it on a plastic wrapper, because plastic doesn't absorb ink, and these alcohol based ones just evaporate leaving the pigment stain, this surface allowed some moving around and blending with other colors.


<EDIT>
While Alcohol inks are fab to play around with and use, if you plan on shopping and then bringing them over to Pakistan or any place outside the U.S... you may not be able to. These are highly flammable hence cannot be shipped on air transit due to flight regulation and safety. Same reason why lighters and large quantities of liquids are not permitted on the air craft. As per the Ranger website terms and conditions, it does state they only ship via ground post.
</EDIT>
Patina
Now these inks are also by Ranger, they're super opaque, dry pretty fast... and well, they're intended for metal. I used them for a tag.


For this tag in greens, there's a lot of Patina, and some wild honey distress. The dimensional bits and bobbles are Liquid Pearls, and the gold is actually a stamp embossed in golden archival ink.
Glossy Accents
While I have used epoxy resin for my charms and gumdrops, there are alternatives for quick dimensional projects. Glossy accents is a chemical you glaze over your imagery or surface, and it yields a clear gloss coat finish. The longer you let it stay, the harder it gets... but it still has that dent quality. So if you jab a finger nail into it, it will leave a mark. It's nice though if you want to create the glazed and glossed look on your embellishments.
I have tried Judikins Diamond Glaze and prefer Glossy Accents over it. The dry time is approximately the same, but I find Diamond Glaze more maleable or 'soft'...
Using it is super easy, you just evenly coat the surface by squeezing the bottle. The Glossy Accent comes through the nozzle. You have to try not to get bubbles, it's pretty neat. :)

Here's how I first tried out Glossy Accents. I punched out a butterfly from a stack of glittered cardstock. Put Glossy Accents over one of them.

After letting it dry, here's what it looked like :)

See the difference? It's that epoxy bubble feel, but it's not resin... it's not hard.

To show you how you can embellish your stamped images, I went ahead and stamped this butterfly.

Covered it with Glossy Accents, you can see the cloudy glaze.

This is a little later, you can see it's drying.

You have the dimensional feel there.
Don't touch it no matter how tempting it is! Let it dry a few hours before you poke it. *wink*
I hope this blog post was helpful to most of you.
To treat our readers at Life as the Firefly Girl Blog, I'm going to give away one bottle of Glossy Accents! To be counted in the draw, just leave your feedback on the post by commenting below :)
wow. Very informative Varah. Love the glossy accents. But could you please tell again what were archival inks and how are they different from the rest of the inks? :c i forgot. Lol
ReplyDeleteAoa...for the beginners like me,this tutorial is so so helpful :) n i loved the distress stain,liquid pearl and glossy accents_jazakALLAHU KHAIRUN_Im not v fond of reading stuff but this was awesome_the way u've demonstrated the fabulous results coming after using these stuff is simply impressive!!!
ReplyDeleteIts from : NOOR_US_SABAH :)
Tfs this piece of information. i really appreciate and this would prove to be informative for many beginners! though I wanted to add a bit to this, The adirondack inks would work well if you dont directly drop them on a paper.. try some felt and alcohol ink blender . it really gives a neat look on paper as well as different surfaces! also give a neat look if you are blending to inks together. thr are endless possibilities with these inks <3 for the glossy accents. yay I am in :)
ReplyDeleteahh playing with these colours must be fun :) Loving the distress inks which give the vintage look and wondeful affect of glossy accent!Jzk for sharing this info
ReplyDeleteI just asked Erum a while ago if she can teach me how to do distress thingy! Thanks for the post Varah ! Not everyone can do this. You rock!
ReplyDeleteJaihan, I haven't all my stuff to give that tutorial babe. Archival dry super fast.. dye and chalk take longer to dry! :)
ReplyDeleteNoor us Sabah, I am so pleased to hear so :) Not everyone has that access and if it's made available locally, I feel everyone should know how to use it before they dive in for purchases.
Tuba, I know babe. Was playing around to show effects on paper as that is the most common surface people work on :) and the first attempt is almost always dropping ink to see what happens ;)
Noor, it gets better with time I suppose. :) Waiyyakum hon!
You're welcome Hira...
ReplyDeleteI had done another post on distressing techniques some time back, it was without the Tim Holtz Distress Inks though :) good luck!
this is so cool! i love the distressed look on a paper and this is pretty helpful Varah...thanks a bunch!
ReplyDeletep.s i love the bookmarks you created <3
wow! that is epic varah baaji! im in love with thatgreen wala tag typo! n woah, so much of information about these ! loved reading every bit of it! :) feel like buying them straight away! it would be hell fun to use them in my cards n different stuff to give sime really elegant n sophisticated look!
ReplyDeletekeep bringing such information to us!
till then -Smile sunshine, xx
Varah! Thanks for the awesome tutorial! very informative... I just love the glossy accents..learned new techniques.. do you know if mod podge is available in Pakistan? And can we make it at home?
ReplyDeleteRegards,
Injela
OHH MY GOD. i love this tutorial, Varah!
ReplyDeleteThanks alot for explaining everything so perfectly. The demonstration is really good. I liked the distress stain, Patina and Glossy Accents more. I think I saw a picture on pinterest where a lady was using distress stain and Gesso on a embossed paper.. You should see that too..
After reading this yummy blogpost, now i am dying to get distress stains, Glossy Accents and those tags you tried the techniques on. LOL.. They are so gorgeous! Would look perfect on a journal page. Just saying. ;)
Keep spreading the pixie dust. Prayers & Sunshine.
Khadija.
Injela, we don't get modge podge in Pakistan, but you can make your own. Try half and half of german glue and water! It should work or come close :)) xx
ReplyDeleteDija, I know the feeling babe ;) Alhamdulillah to you guys enjoying this!
amazing tutorial review, as usual! :) am in love wid the distress ink magic, it really do wonders an a super treat for me as am also a fan of evrything vintage. wt a delight for the eyes ur work is, MASHALLAH! am so dying to use d glossy accent n thanx for d guidance as i thought dt judikins diamond glaze is bettr dn glossy accent.
ReplyDeletexoxo
hey varah, just a thought. pearl paints are available in pk as well. hav u tried them? i did try em ages back to make some greeting cards, worked beautifuly. n nt to forget its cheap too
ReplyDeletehey yes I have,they are lovely as a pearl glaze. their consistency isnt as fab so dont like using them much. not too fond of the smell either...
DeleteI am anxiously waiting fr u to cm back, so i cn have awl of em ;)
ReplyDeletemuch love.
Love this post...I love love my distress inks...my current total stands at 24 colors...and they are awesome...more awesome is the way the distress inks reacts with water...do try that..love the ghostly image that pops up!
ReplyDeleteand I would love to try liquid pearls, but my question is do they stay hard? or if pressed down, they get flat? after air drying for 24 hours or so!!
Glossy accents, love it..I used it as a glue(but for flowers and heavy embellishments! pinches the pockets too much)
Thanks for this fab post girl!
Tejal, the demo squirts and lines I did on the tags for the tutorial are pretty solid! I poked into them and picked at them with the finger nails.. no dents :) They're super hard when you press on them. :D
DeleteI'll try out the water mix with the distress inks.
And I've read people use the glossy accents for adhering metal and things, have yet to try it for myself. :)) I'm so glad to see everyone enjoying this post so much! x
ooohh mmyyy goodness *eyes wide open* <3 :D
ReplyDeletei wish pakistan hv shops like this so that i can try everything ^_^
Oh wow I love what you've done with the inks...I bought one distress ink in purple a few months ago but I was afraid to use it. Will give it a try now. Thanks
ReplyDeletei love the metal greens and blue one......but most of all i loveeee the glossy accents!!! i love the as tempting as it is dont poke lol!!!!! thankyou for this post :)
ReplyDeleteI never knew all this...this is super awesome and thank you so much for the tutorial :)
ReplyDeleteW.O.W. thanks Varah for sharing this, i did'nt know that there are so many different sort of inks, all i knew were pigment, dye, chalks and i recently discovered distress inks... thanks a ton... i've already ordered distress inks would love to have Liquid Pearls or glossy accents... :) <3 (craft bug)
ReplyDelete