Every one of us who crafts has that stash of paper snippits that are too pretty to throw away, and you think that, oh, I'm going to just use these in my next mini, or the next tagbook could use some of that.. I'll just store it for later.
......
what happens though, you end up storing it in like a million different places, and every time you sit to do some work, you don't know what to do with all this paper... Paper you've spent money on, paper that is in great shape to use for next time, paper that is getting dents and creases sitting in a pile here, there, on the desk, on the corner shelf, in that box, sticking out of that file, and waiting under that heap of other embellishment stuff you'll be using very 'soon'.
So given, I've been on a studio revamp yet again, I thought I'd start with rearranging these 'scrap' pieces of paper. I had my 12x12 stacker shelf made a few months ago, so those papers, and the slightly larger scraps sit in there neatly. It's the little pieces here and there that drive me crazy.
Since I shifted some stuff to Hong Kong, I had a couple of these storage boxes that were empty. The poor lid is going to have to rot out some where for a while, but I managed to organize those scraps. Been meaning to do this for a really long time, but the last time I tried it, I didn't use boxboard dividers, and everything just looked really messy.
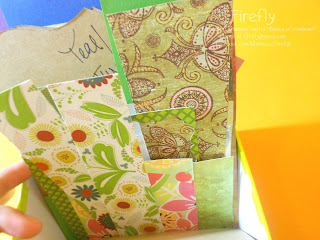
I tried it again today and it worked. Alhamdulillah! I've sorted the papers by color... and then have a few extra slots of themes like vintage, baby, birthday and 'pattern'. These I've kept separately because these I have a regular use of, and it makes more sense to store everything together here. :) I also stored my birthday themed and baby themed stickers and what not in here too since the box is a great size... so it holds up most of the a5 sizes and standard packaged contents :)
Just a little how to on organizing your bits and pieces. :)
PS: I did the dividers with a Tim Holtz Die. :) Was planning on labeling them properly with color tabs and all, got lazy. Just markered it out :)
How I did it was super easy. I snipped down the papers, just enough so they didn't look super messy. I cropped them in areas I knew I couldn't use anymore. ie dents, punched out shapes, ink splatter, etc... and this helped fit them in the box as well.
If you don't have a pretty box lying about, get a shoe box, and pretty it up with some gift wrap or leftover scrap booking paper :)
I sorted the papers by color to be divided by Kraft. I cut down to the size of the box. An A4 sheet of Kraft paper does the trick when you use the cutter down the middle. Super simple. If you want to pretty up the dividers, you can. I just wanted to get my room to look tidy and had some work to finish up.. do didn't bother with it. :P
Have fun :)




......
what happens though, you end up storing it in like a million different places, and every time you sit to do some work, you don't know what to do with all this paper... Paper you've spent money on, paper that is in great shape to use for next time, paper that is getting dents and creases sitting in a pile here, there, on the desk, on the corner shelf, in that box, sticking out of that file, and waiting under that heap of other embellishment stuff you'll be using very 'soon'.
So given, I've been on a studio revamp yet again, I thought I'd start with rearranging these 'scrap' pieces of paper. I had my 12x12 stacker shelf made a few months ago, so those papers, and the slightly larger scraps sit in there neatly. It's the little pieces here and there that drive me crazy.
Since I shifted some stuff to Hong Kong, I had a couple of these storage boxes that were empty. The poor lid is going to have to rot out some where for a while, but I managed to organize those scraps. Been meaning to do this for a really long time, but the last time I tried it, I didn't use boxboard dividers, and everything just looked really messy.
I tried it again today and it worked. Alhamdulillah! I've sorted the papers by color... and then have a few extra slots of themes like vintage, baby, birthday and 'pattern'. These I've kept separately because these I have a regular use of, and it makes more sense to store everything together here. :) I also stored my birthday themed and baby themed stickers and what not in here too since the box is a great size... so it holds up most of the a5 sizes and standard packaged contents :)
Just a little how to on organizing your bits and pieces. :)
PS: I did the dividers with a Tim Holtz Die. :) Was planning on labeling them properly with color tabs and all, got lazy. Just markered it out :)
How I did it was super easy. I snipped down the papers, just enough so they didn't look super messy. I cropped them in areas I knew I couldn't use anymore. ie dents, punched out shapes, ink splatter, etc... and this helped fit them in the box as well.
If you don't have a pretty box lying about, get a shoe box, and pretty it up with some gift wrap or leftover scrap booking paper :)
I sorted the papers by color to be divided by Kraft. I cut down to the size of the box. An A4 sheet of Kraft paper does the trick when you use the cutter down the middle. Super simple. If you want to pretty up the dividers, you can. I just wanted to get my room to look tidy and had some work to finish up.. do didn't bother with it. :P
Have fun :)


